CittaVR User Manual
CittaVR for Unity is a framework that allows you to create virtual twins for real environments
Introduction
CittaVR for Unity is a Unity framework that allows you to create virtual twins for real environments, to manipulate or sense the state and status of your sensors and actuators.
It is available for (and compatible with) both Linux and Windows platforms, but this manual focuses only on the Unity Editor for GNU/Linux systems. On the other hand, as always with Unity, you can create your models using the same editor (with ProBuilder), or an external tool, like Blender.
Let’s begin with the installation.
Installation of Unity on Linux
Note:
To download the most recent version of the Editor (or any older one), you should use the Unity Hub, which could be found here:
Mark it as executable and run it (you could, of course, do it from the GUI):
chmod a+x UnityHub.AppImage
./UnityHub.AppImage
Once you start the Hub, you could go to the Installs tab and add the version you prefer:
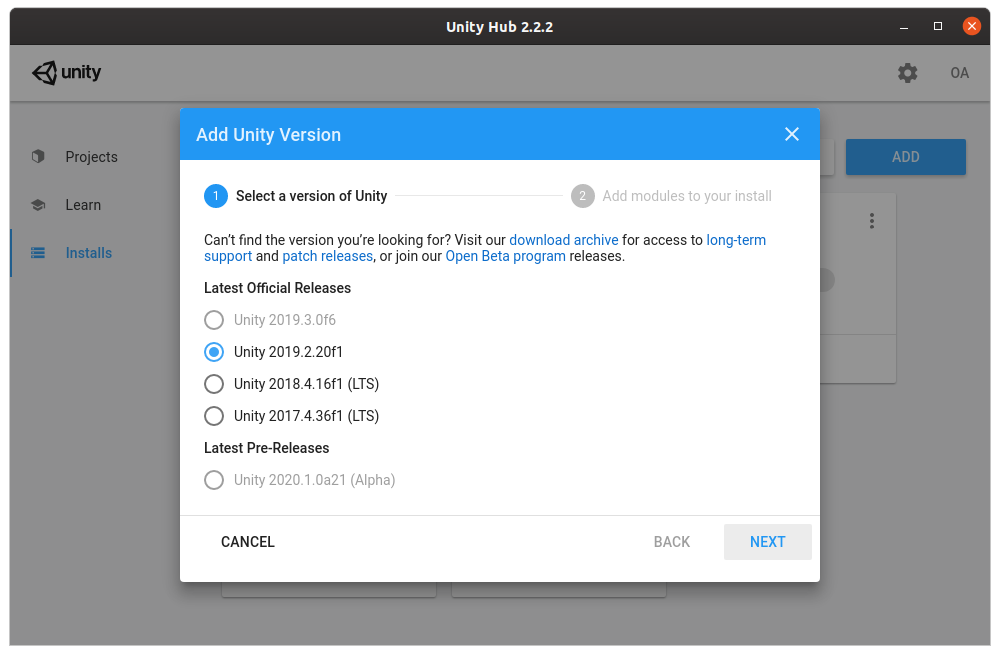
Unity Hub: adding a Unity version
Also, you will need an external tool for editing the source code (in
C#). You may use whatever you want (like Emacs or Atom), but the
recommended IDE (and what has better integration) is Visual Studio
Code. You can just grab the .deb
package and install it like any other Debian package.
Now, you are ready to start a new Unity project and add support for CittaVR to it. Let’s see how.
Creating a new project
This step is very straightforward: just open the Unity Hub (if you closed it) and go to the Projects tab. Click on the New button. Select the project type, its location and also the name:
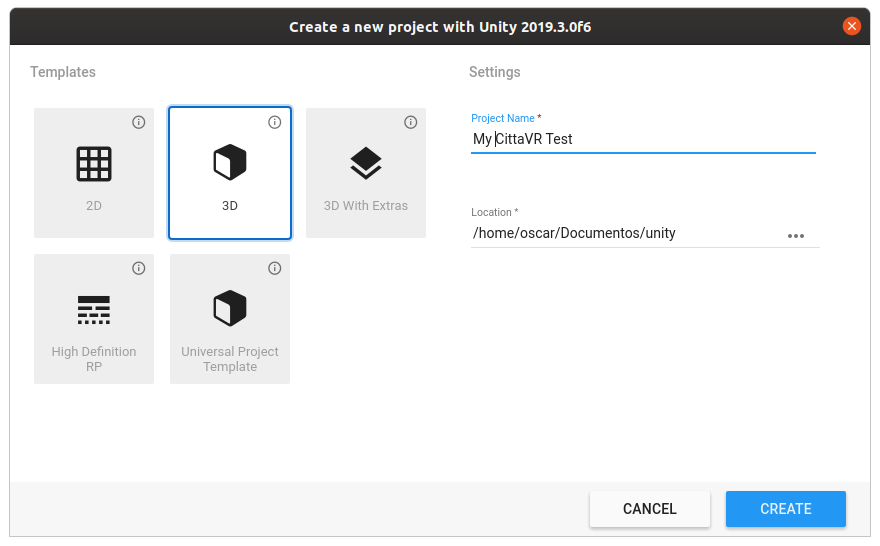
Unity Hub: creating a new project
Press on Create and wait. It will take some time to
compile the minimum assets included by default on every new
project. Just wait until it finishes and shows the Unity Editor with
your newly created project.
Setting .NET framework
First thing you should do is to change your project settings, because by default, it uses .NET Standard 2.0, which is not yet fully compatible with ZeroC Ice and other libraries.
So, go to Edit > Project Settings > Player. This will open a new inspector
window with some of your project settings. Open the section called Other Settings and find the API Compatibility Level, as seen in the following
picture:
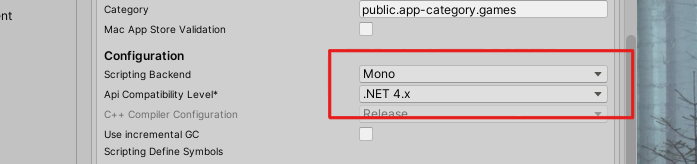
Unity: change the .NET version
Set it to .NET 4.x and close the inspector. It will compile again all your
assets using the new framework version, so please wait.
Open C# project
Now is a good time to check your IDE integration (if you want to use an IDE,
anyway). To configure the recommended settings, got to Edit > Preferences. In
the tab External Tools, change the property External Script Editor to
“Visual Studio Code Insiders” (click on Browse if needed). You can see this
dialog in the following screenshot:
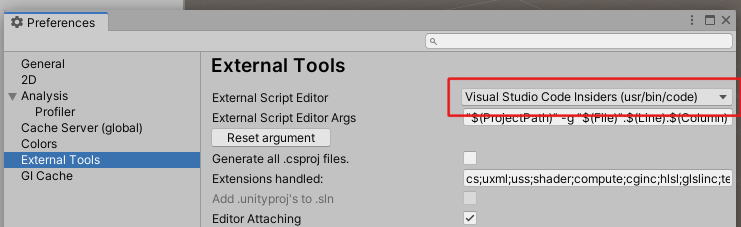
Unity: external source editor setting
And to open the C# project, just right click on an empty space of
your Aassets folder, and click on Open C# Project:
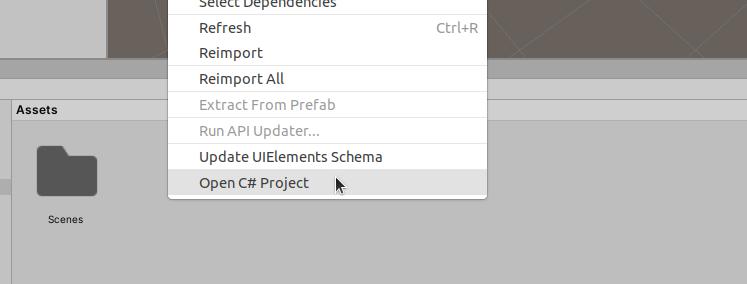
Unity: open C# project with your IDE
If you now see VS Code open, and loaded with your Unity project, well done! You are ready for rock ’n roll! ;)
Setup of IDM router
CittaVR may use IDM as its internal middleware for communicating with external
objects and to receive incoming invocations. So, if you want to enable the IDM
support, first thing you should do is to setup an IDM Router (in case you
don’t have already one). Don’t worry, its pretty easy. Just make sure you
installed the IDM Debian package (or do it now!) and create a new
configuration file for it (call it router.config). I usually put it on the
Assets folder:
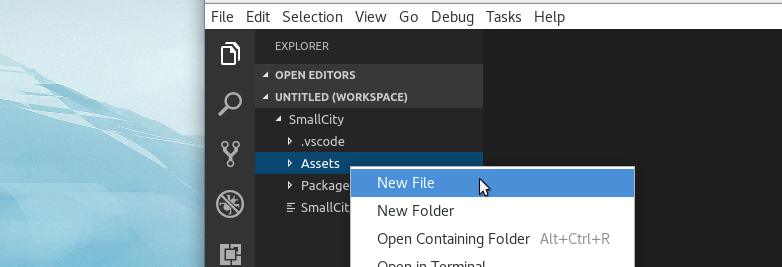
VS Code: create the IDM router config file
Next, add the following properties (and adjust them to suit your needs):
Router.Adapter.Endpoints = tcp -h 127.0.0.1 -p 6140
Router.Table.Path = router.table
Router.Ids = 0A01C17400000001
To launch the router, just use this configuration file:
idm-router --Ice.Config=router.config
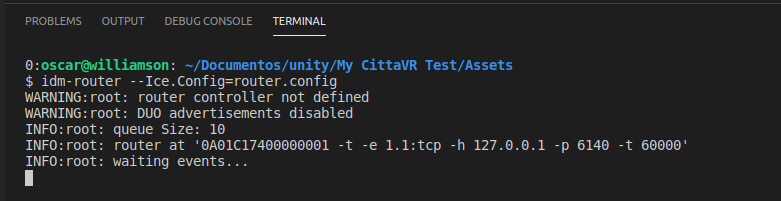
IDM: running the router with your settings
Add CittaVR config file
CittaVR uses a configuration file to store some of its settings (in particular,
where is the IDM router you want to use, if any). So, let’s create a
CittaVR configuration file. The file must be located in the
Assets/StreamingAssets folder (we use this location in order to ensure that
Unity will bundle them when building), and be called cittavr.config. You
may specify the following properties:
-
IDM.Router.Proxy, which is clearly the proxy of your IDM router. If you used the previous configuration file, this value would be0A01C17400000001 -t -e 1.0:tcp -h 127.0.0.1 -p 6140. Note: if you are contacting with IceC devices, remember that you must add-e 1.0here. -
CittaVR.Adapter.Endpoints, as CittaVR will expose virtual objects to the real world, you will need to specify the endpoints where they should be contacted. These virtual objects will be registered on the given IDM router, so these endpoints must be reachable by the router. -
CittaVR.Id, as we will see later, CittaVR provides an object to dynamically instantiate new objects. This is the identity of this object. You should put here something in the same domain as your router (in this example, something like0A01C17400000001), and make sure that there are enough free addresses starting from this one, as the new dynamic objects will be using them.
The following is a full configuration file, which uses the previously defined router:
IDM.Router.Proxy = 0A01C17400000001 -t -e 1.0:tcp -h 127.0.0.1 -p 6140
CittaVR.Adapter.Endpoints = tcp -h 127.0.0.1 -p 9001
CittaVR.Id = 0A01C17400000002
Installing ZeroC Ice for Unity
As you may already know, CittaVR uses ZeroC Ice, so before anything else, you must install it. ZeroC provides its libraries and tools for C# using the NuGet repositories, and there is a plugin to add support for NuGet to Unity, so this is what you need to install.
First, download the plugin in the following site (is an asset in the form
of .unitypackage):
In my case, I downloaded the 2.0 version. Then, you can import it: right
click on Assets folder and select Import Package > Custom Package...:
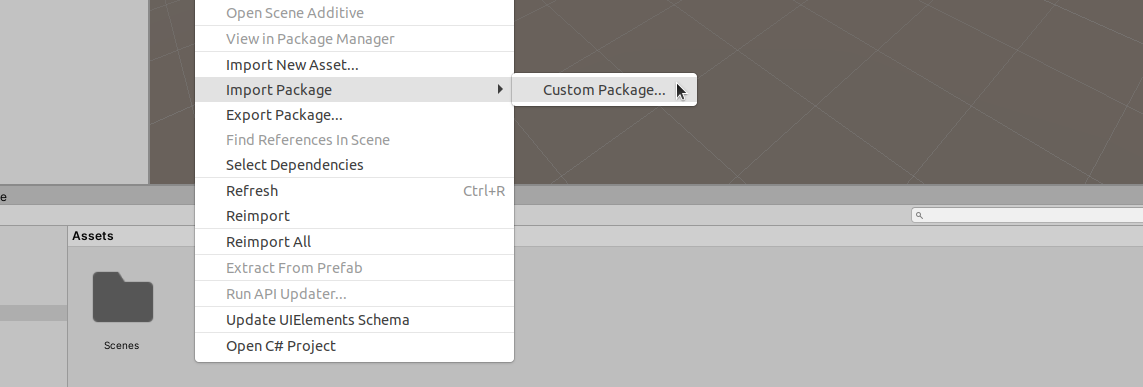
Unity: import custom package
Select the file you downloaded and click on Open. It will show you a window with
the assets to import. Select all and press Import. It may take a while, so be
patient. Once finished, you should see a new menu entry:
Unity: NuGet correctly installed and compiled
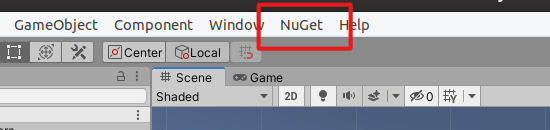
Ok. Go to NuGet > Manage NuGet Packages. It will open a new tab that
allows you to install new packages. It may open as a floating
window, so feel free to drag it where the other tabs are, to expand
it. Now, press on Search and find the package called
zeroc.ice.net:
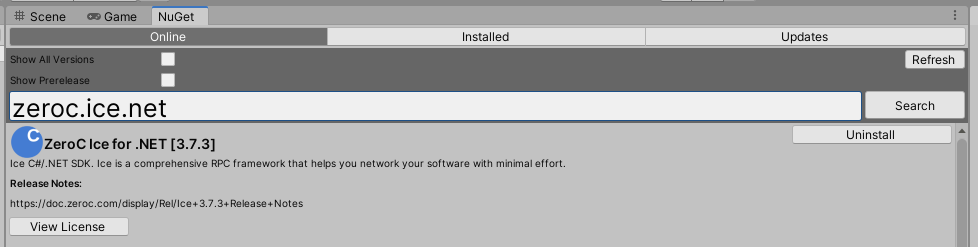
NuGet: installing ZeroC package
Press on install and let it finish. When done, you are ready to include the CittaVR packages!
Adding CittaVR assets
Until now, we only set up the environment to work with CittaVR, but we didn’t install it. Now is the time. CittaVR has many components: a Debian package with scripts to communicate with the internal manager to instantiate new objects and two Unity packages, one for the core and another with common assets.
The Debian package could be installed using the Pike repository (visit the link for instructions), just like any other package:
sudo apt install cittavr-unity
The Unity packages could be downloaded from CittaVR
repository, under the
Downloads section. For convenience, I put here the links to the
latest versions, just click to download and save them.
Now, you can import both packages into your project, using the same procedure as before, ot just drag and drop the package inside the Assets folder of your Unity Editor. Add first the CittaVR Core package:
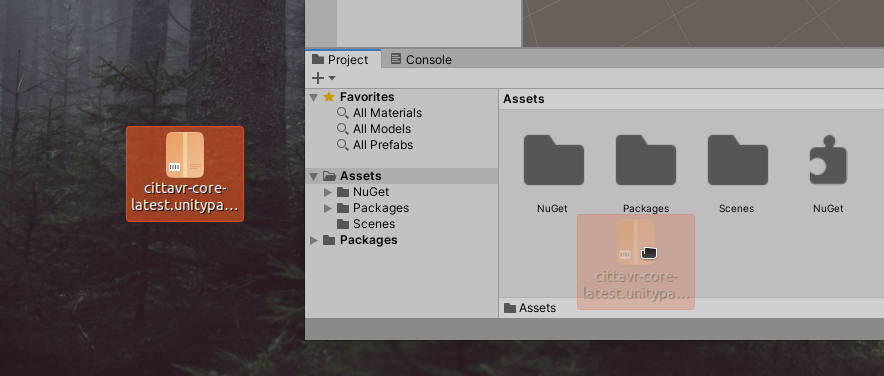
Unity: installing CittaVR Core
On drop, it will show a new window to select what components you want to include. Confirm that all is selected and press on import. Repeat the same process to include the package ‘CittaVR Assets’ you downloaded earlier.
The final step to conclude your setup is adding to your scene an
instance of the CittaVRApp prefab, which is needed to initialize
all the internal runtime of CittaVR. Go to Assets > CittaVR folder
inside your project tab on the Unity Editor. There you should find a
prefab called
CittaVRApp (the blue 3D box), drag it and drop into your Hierarchy
tab (and save the scene!).
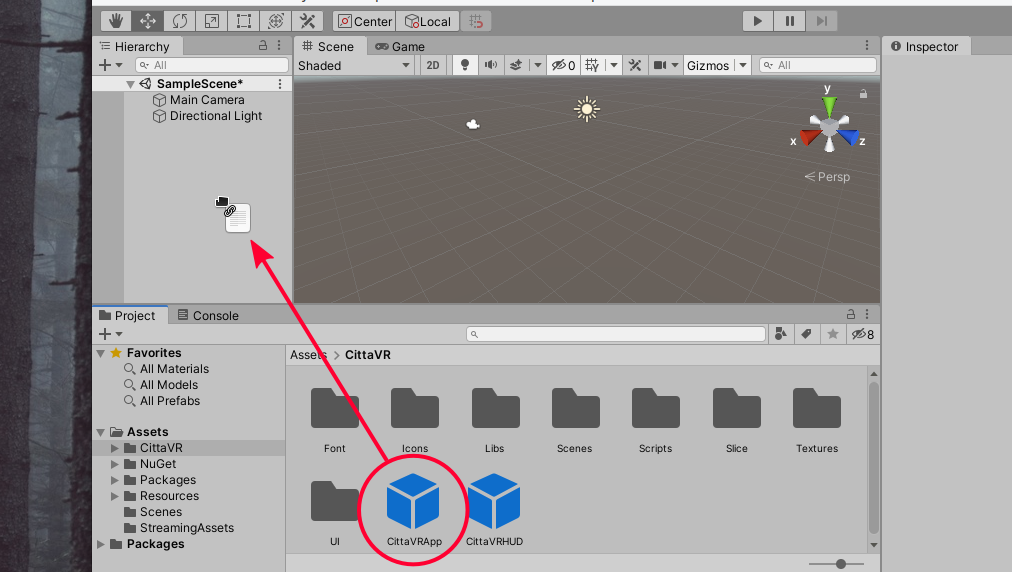
Unity: adding the CittaVR prefab
Now, you can press play on Unity, and (if everything went ok), your CittaVR manager should have registered correctly on the given IDM router. You may see messages like these:
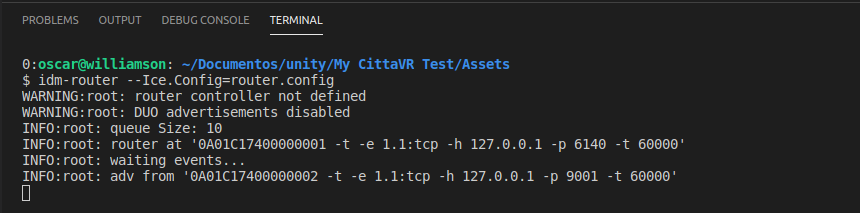
IDM: CittaVR manager advertisement

Unity: starting messages of CittaVR
Press stop, we are going to add some objects to the scene!
Static instantiating
In the folder Assets > Resources > CittaVR you will find some more
prefabs. These are the objects that come bundled with CittaVR. Of
course, you are not limited to use only these, later we will
see how to create new ones, but as a starting point they will do.
Depending on the version you downloaded, there will be more or less available assets. As of writing this document, there were: a street lamp, a traffic lights and a proximity sensor. Let’s add the street lamp first.
The process is exactly the same used to add the CittaVRApp: just
grab the StreetLamp prefab and put it on your scene,
wherever you want. After that, you may see something like this:
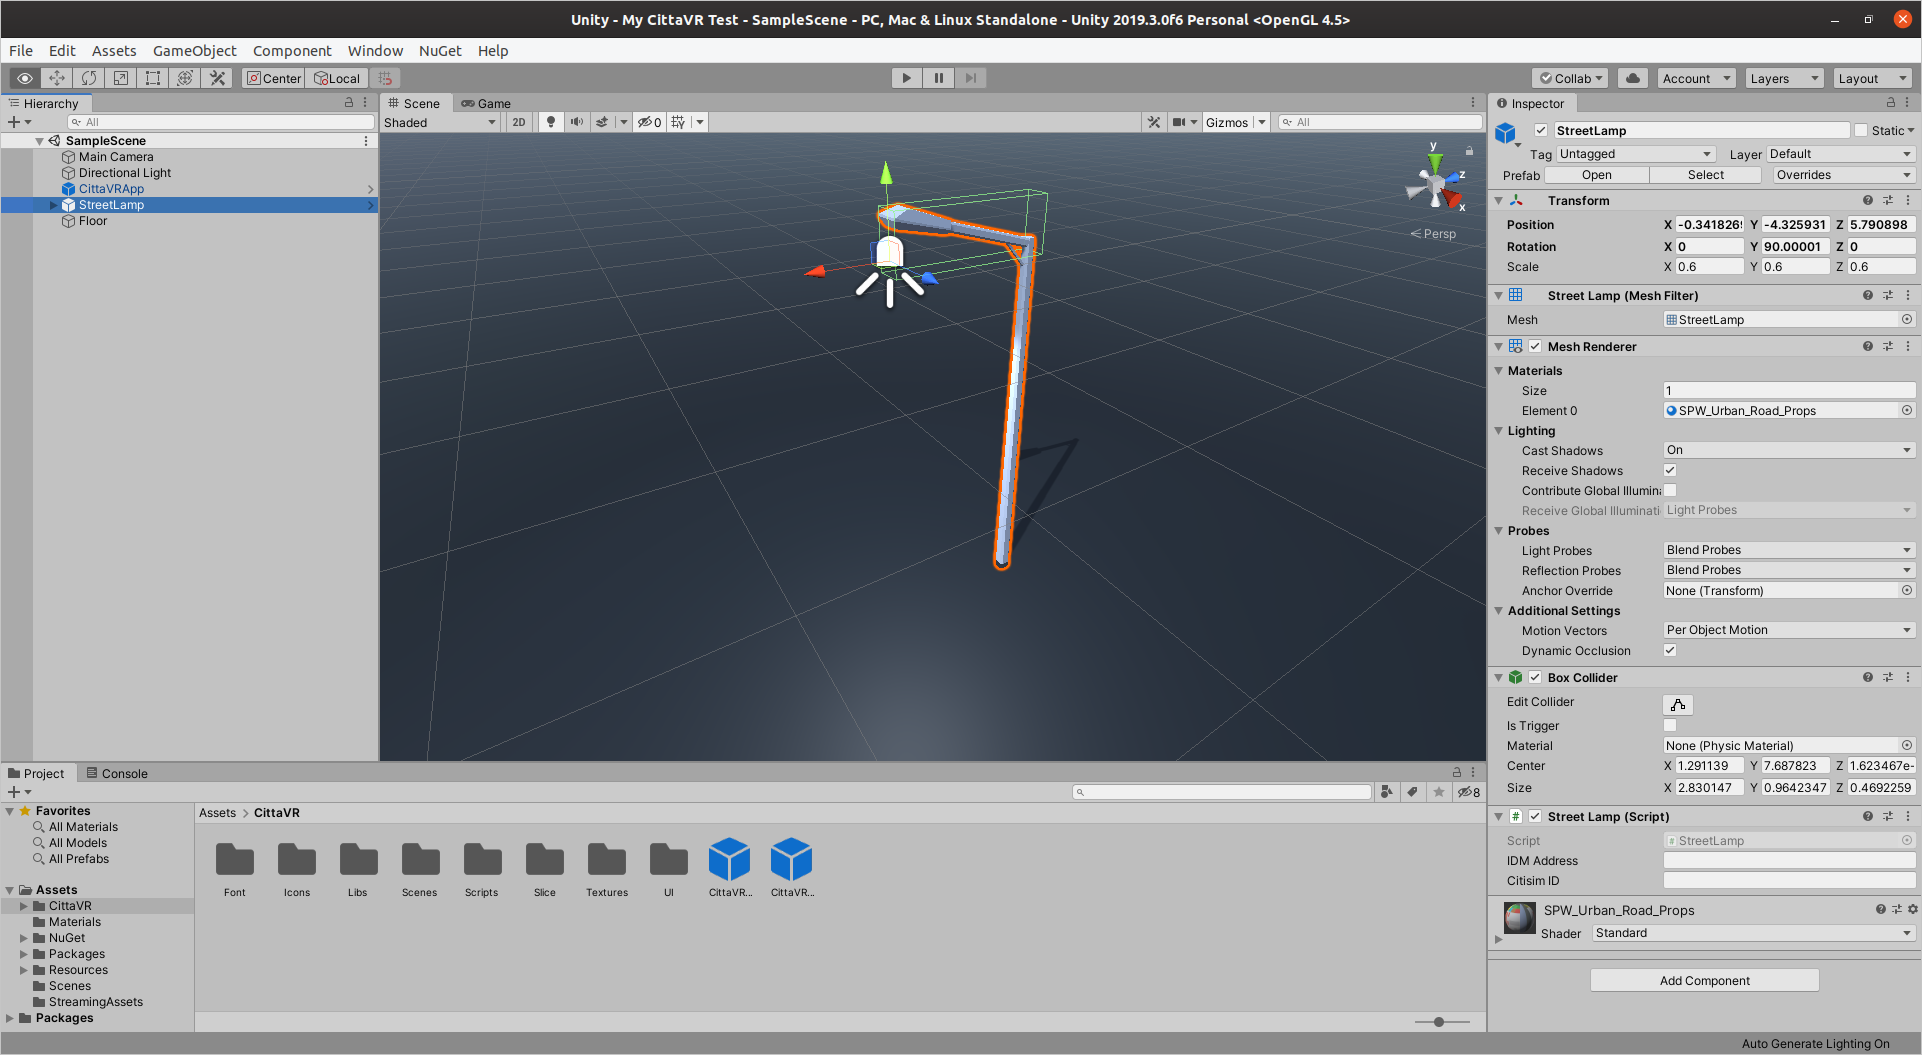
Unity: adding a new StreetLamp asset
Well, OK. Maybe I’ve changed some little things (I’ve added a plane as a floor, reduced the light intensity and switched on the Street Lamp), but you get the idea, there is a street lamp on my scene, as should be in yours! Now, you can press play again and your street lamp will be ready for action. You may see a warning message like this:

Unity: running without IDM address
The reason is that you didn’t set a valid IDM address for this object. In
order to be reachable, or to know the source of a virtual event, every object in
CittaVR should have an IDM address. If you don’t set it, CittaVR will
automatically choose one from the address pool (in this case, the next free
address: 0A01C17400000003. If you want to set it, go to the object inspector
(right side in the above picture), and find the Street Lamp (Script)
component. There, you should see two properties:
IDM Address, which is the field we need to change, the address of this object for everyone else (including the outside world!)Citisim ID, this is an internal identifier, used for dynamic instantiating, don’t to worry about it now.
So, to change the IDM Address field, add a valid address, in the same domain
that your router, like 0A01C17400101234. Then, if you press play again,
you will get rid of that warning. One way or the other, the object should have
been advertised on your IDM router, like this:
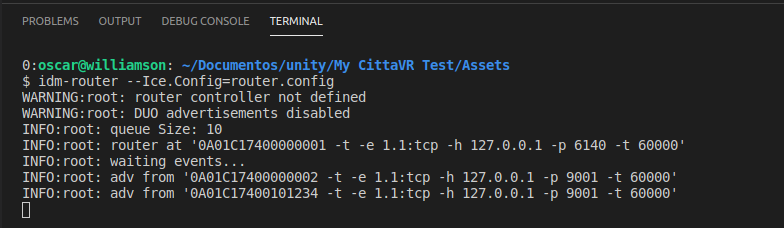
IDM: advertisement of the new Street Lamp
Now, you can change its status from inside and outside Unity. From inside,
just click on the street lamp head, and it should toggle the lamp status. To
change it from outside, you must know that this lamp implements the Smart
Transducer interface st::IBool, so you need a client that uses this
interface. For instance, the Debian package smart-transducer provides a
command line tool that could be used for this purpose. To reach the object
directly, use the proxy that you saw on the advertisement:
st-client -t bool -p "0A01C17400101234 -t:tcp -h 127.0.0.1 -p 9001" 1
st-client -t bool -p "0A01C17400101234 -t:tcp -h 127.0.0.1 -p 9001" 0
But, if you want to use IDM (which is, by the way, the proper method), you will use the router’s endpoints and the object’s address, like this:
st-client -t bool -p "0A01C17400101234 -t:tcp -h 127.0.0.1 -p 6140" 1
st-client -t bool -p "0A01C17400101234 -t:tcp -h 127.0.0.1 -p 6140" 0
In this case, you will also see how the router forwards these messages to the proper destination:

IDM: forwarding messages to the lamp
What is more, this object also implements the interface st::Linkable, so you
can set another object as its observer (or link), and when the lamp changes
its state, it will notify the new state to this observer. Also, this lamp
could be the observer of some other object. Let’s do it!
Dynamic instantation
We will use one of the other prefabs that come with CittaVR Assets: the proximity sensor. The scene could be the following:
So, we need a proximity sensor that detects a new car, and then switches
on the street lamp. This sensor implements the interface st::Linkable, and
sends events using st::IBool, which is the same interface implemented by the
StreetLamp object. We can just connect one to the other.
If you go to the Assets > Resources > CittaVR, there should be a
ProximitySensor prefab. You could just add it to your scene, as we
did earlier, but we want to do it differently, in a dynamic way
(i.e: having the whole scene running).
Note:
To achieve this, first thing you need to do is to press play on the Unity
editor, as we need the CittaVRApp running. Then, open a terminal window, and
use the cittavr companion tool to add the asset. You need to specify your
project folder (the Unity project root folder), the name of the asset
and the position in the scene to place it. For instance:
cittavr . --add-asset CittaVR/ProximitySensor --pos 0 3.5 0 90
Note:
Of course, you can use the supplied Ice interface directly from your program to achieve the same result. In any case, the proximity sensor should be displayed like a red box (you will see it in the game tab and also in the scene editor tab):
Proximity Sensor: normal appearance
You may don’t want to see this red box, so just uncheck the Mesh Renderer
option of the proximity sensor prefab (remember, if you want to make this change
permanent, add the prefab to the scene statically):
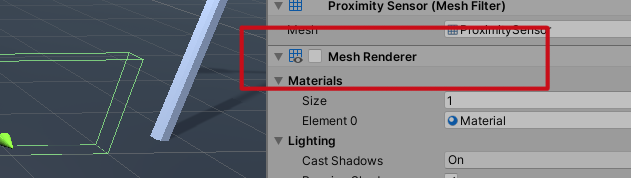
Proximity Sensor: disabling the red box
Now, when some object collides with this one, it will emit a message to its
observer (if no observer is set, nothing will be done). Note that the colliding
object should be a Rigid Body, and also have some type of collider on
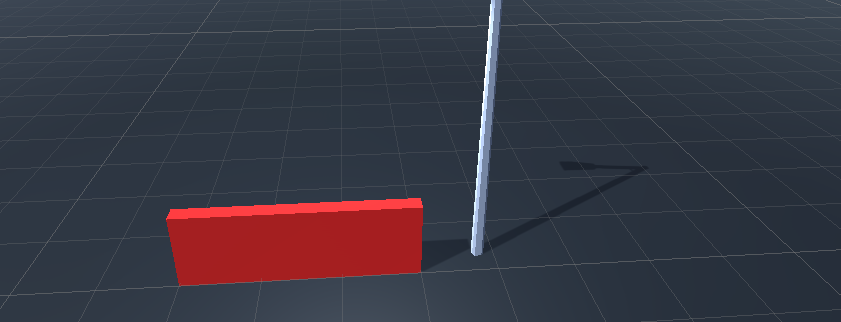
it. So its time to add the object that will activate this sensor, just to
test if everything works. Press Stop on your player, and add a cube or
something that will collide with your sensor. Now, you can press play, and add
the proximity sensor again, using the cittavr tool.
But, if you expect the light to switch on, you will get disappointed! :) Why?
Because we didn’t connect both objects (yet). Its a simple step. Open a new
terminal window, and use a tool called st-link-to, available on the
smart-transducer Debian package. It needs two parameters: first, the proxy
of your observable object (which is the source of the events), and second,
the IDM address of the observer (that is the object that will receive the events).
In this example, the observable object is the proximity sensor (IDM:
0A01C17400000003) and the observer is your street lamp (IDM:
0A01C17400101234).
So, to connect both elements using the router endpoints, run the following command:
st-link-to '0A01C17400000003 -t:tcp -h 127.0.0.1 -p 6140' 0A01C17400101234
Now, when the sensor detects some collision, it will invoke the street lamp, which will power on. Later, if the sensor stops detecting the collider, it will also notify the lamp, but with a delay of 8 seconds (which is the default value of the prefab).
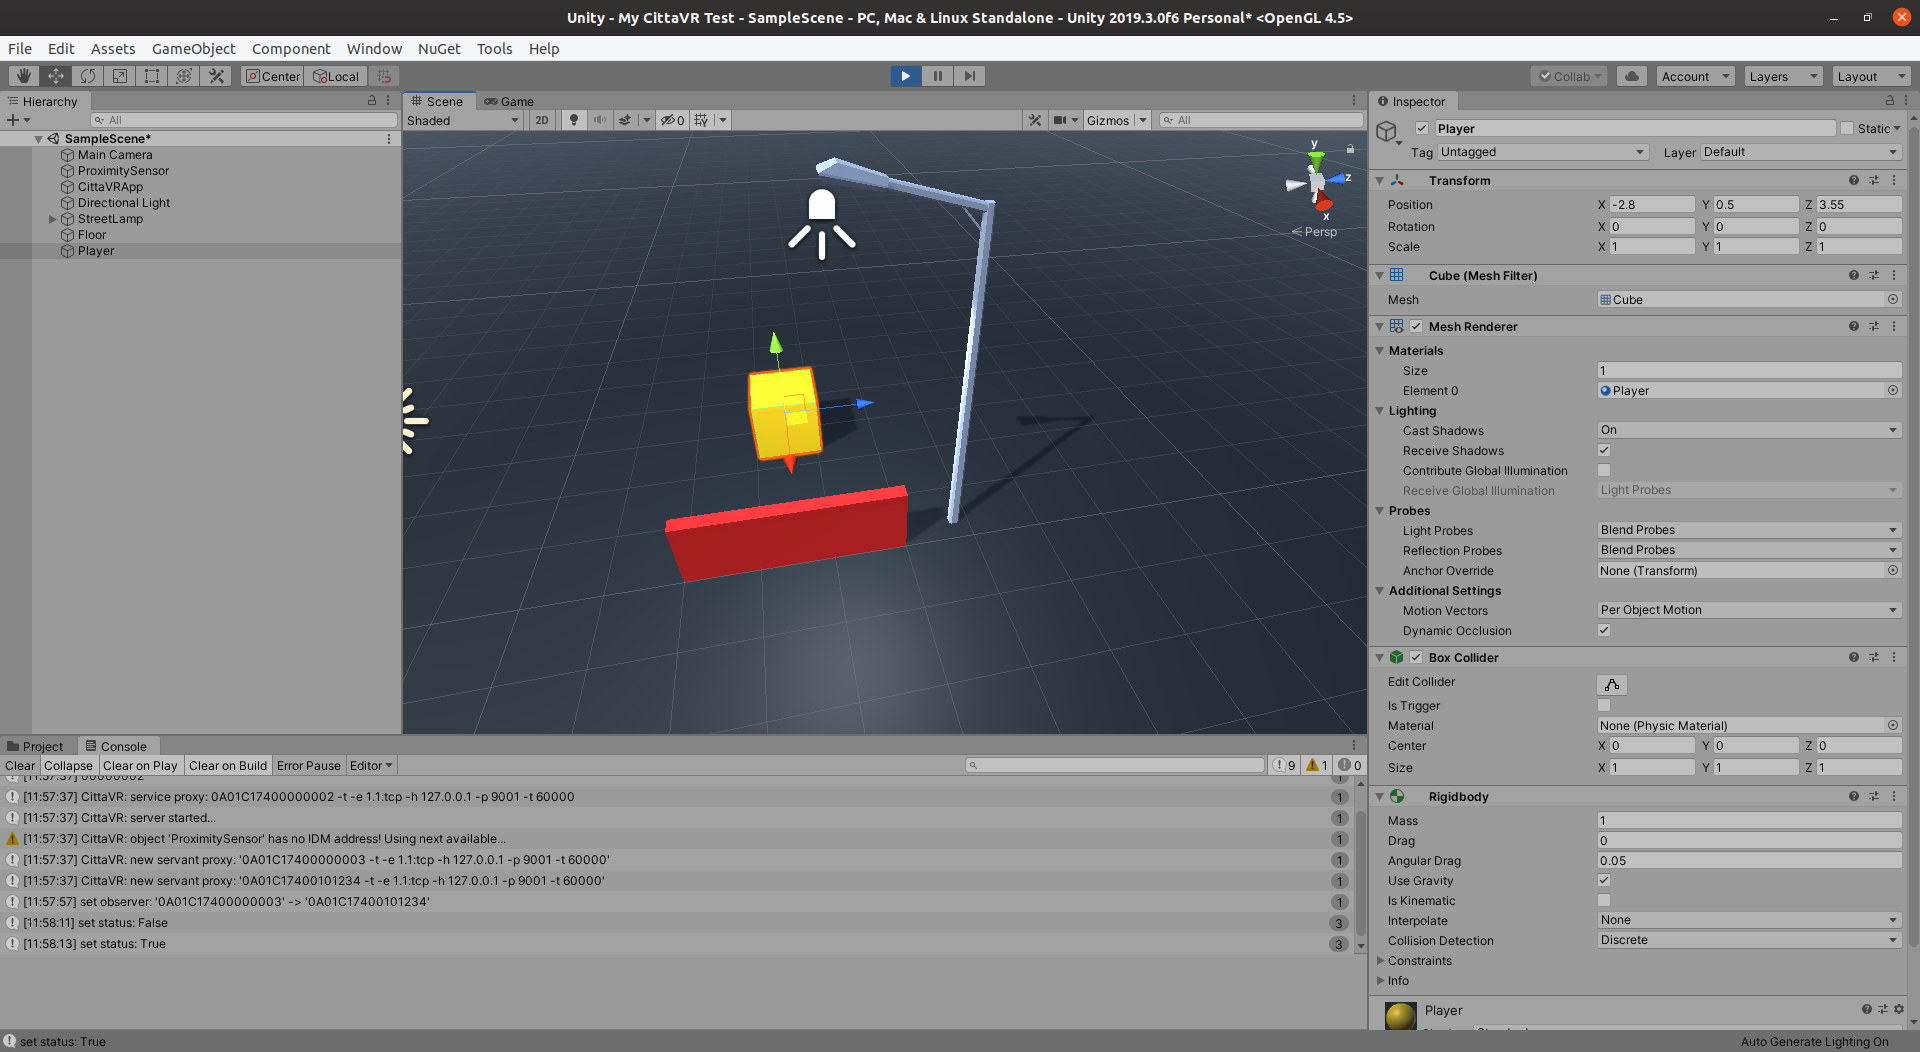
Test: the yellow cube just collided with the sensor
The next big thing to achieve is the task of creating new CittaVR compliant assets. This will be analyzed in the following section.
Creating a new CittaVR Asset
A CittaVR asset is usually a prefab which provides the mesh, materials, textures, scripts and other components in a single unit. Thus, you just need to add it to your scene, and maybe change some settings.
In this section, we will create a new asset, step by step. It will be a level crossing, and will provide an interface to set its state (up or down).
Model in Blender
Well, this part is very ‘simple’: just open Blender and create the model you wish. Take note that you will import it into Unity, so you must know the limitations and caveats it has (which will not be enumerated here). If your model is simple, you won’t have any problem. Even some modifiers work out of the box, like basic textures do (the UV mappings are also imported correctly). Specific shaders or node materials are not supported, you must create them inside Unity.
Note:
For this example, I’ve created a simple barrier, like this:
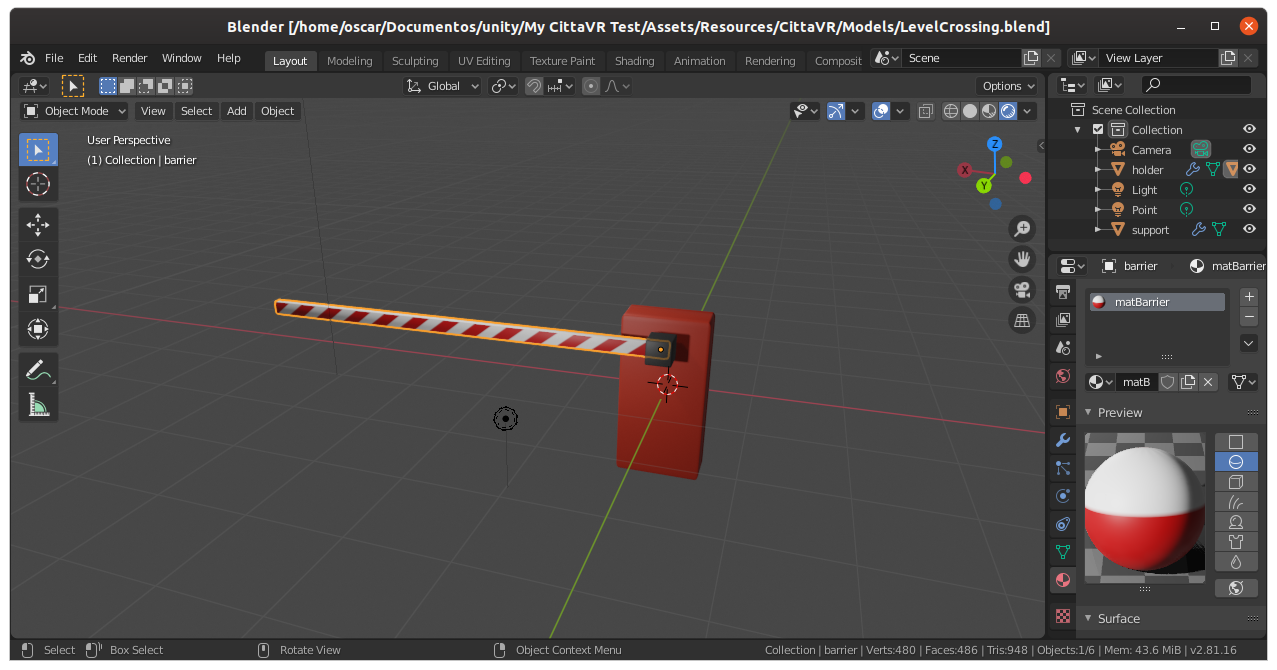
Blender: a basic train barrier
Creating the prefab
Add your model to the assets folder of your Unity project, and then to your scene, to check if everything is correct. Adjust your model materials, and textures, and add whatever component you need.
Now, to create your prefab, just drag the model you added in your scene
(which you have modified, adding components, etc.), drop it on your
assets folder and select Original Prefab:
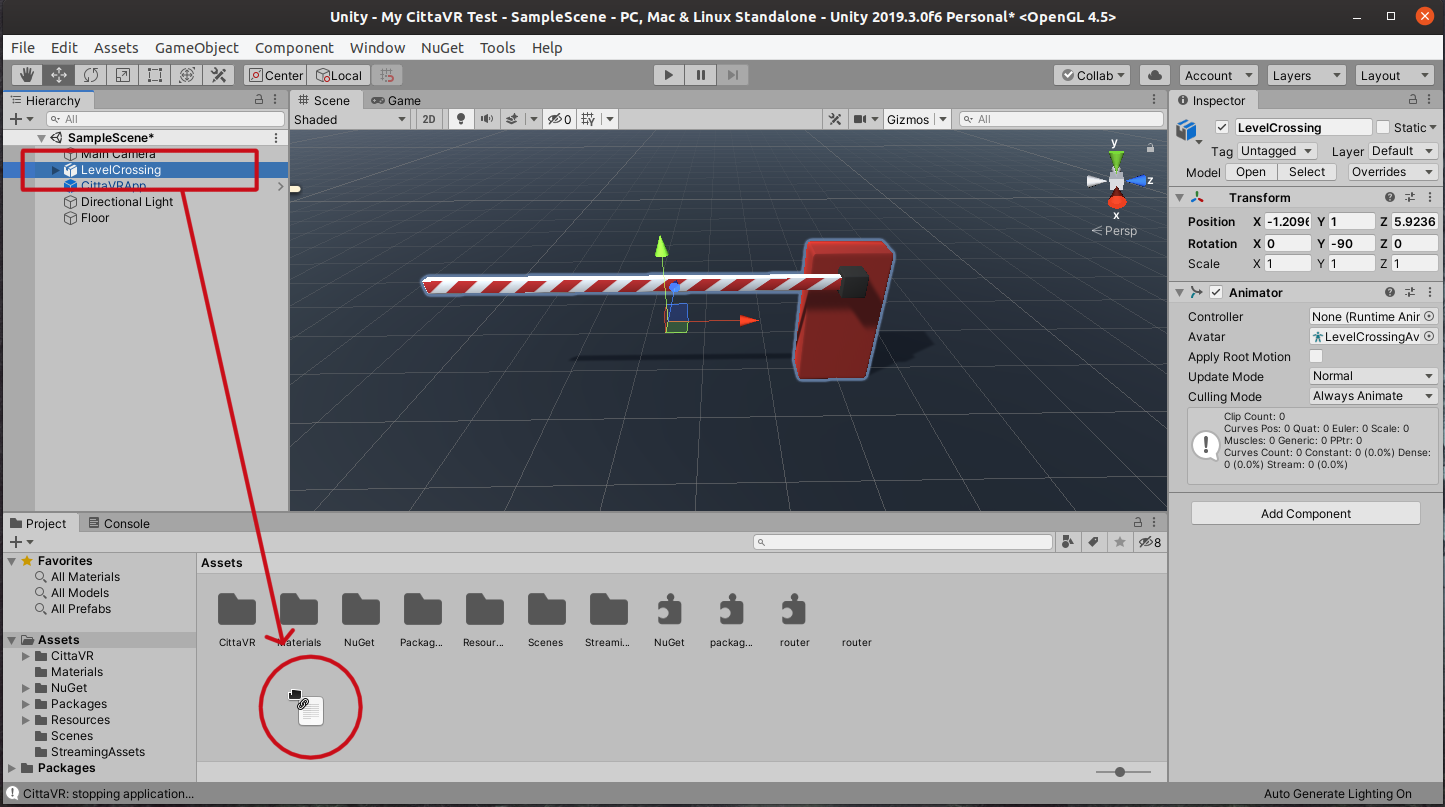
Unity: populating the prefab with your instance
Now, you have an object which will be the template used to instantiate new objects. Note that you still need to preserve the original model imported from blender, and also the textures and associated scripts.
Companion C# script
Up to now, your asset is not integrated into CittaVR in any way. So, create a new empty C# script, and open it with your editor.
First of all, you will need to create a new class, that inherits from
CittaVR.AssetManager (which is a subclass of MonoBehaviour
). Among other tasks, this class will be used to instantiate your
Ice servant, so you must implement a method called
create_servant, which has the following signature:
public abstract Ice.Object create_servant(
    GameObject obj,
    ConcurrentQueue<GUITask> task_queue,
    Ice.ObjectPrx router);
The given parameters are:
GameObject obj: the actual GameObject to which this script is attached to.ConcurrentQueue<GUITask> task_queue: this is a queue ofGUITask, used to execute drawing functions on the GUI thread. If your servant wants to modify the scene on runtime, this is the way to achieve it.Ice.ObjectPrx router: the IDM router that you have to use.
So, on this method, you should create and return an instance of your
servant. For example, this asset will use the st::IBool interface, so I create
my servant as this:
class LevelCrossingServant : st.IBoolDisp_ {
    private static ILogger logger = Debug.unityLogger;

    private GameObject _obj;
    private ConcurrentQueue<GUITask> _task_queue;
    private Ice.ObjectPrx _router;
    private string _observer;
    private string _source;

    private Transform _barrier;
    private Quaternion _originalRot;

    public LevelCrossingServant(
              GameObject obj, ConcurrentQueue<GUITask> task_queue,
              Ice.ObjectPrx router, string source) {

        this._obj = obj;
        this._task_queue = task_queue;
        this._router = router;
        this._source = source;

        this._barrier = _obj.transform.GetChild(0);
        this._originalRot = _barrier.rotation;
    }

    public override void set(bool value, string source, Current current=null) {
        // enqueue UI update
        _task_queue.Enqueue((mb) => {
             _barrier.rotation =
                _originalRot * Quaternion.AngleAxis(value ? 90: 0, Vector3. up);
        });
    }
}
Here, I’ve implemented the set() method. What it does is to enqueue an
operation of update inside the GUI thread, to just rotate the barrier to one
side or the other.
With this class, I’ve implemented the create_servant() method as follows:
public class LevelCrossing : CittaVR.AssetManager {
    private LevelCrossingServant _servant;

    public override Ice.Object create_servant(
            GameObject obj, ConcurrentQueue<GUITask> task_queue,
            Ice.ObjectPrx router) {

        _servant = new LevelCrossingServant(
            obj, task_queue, router, IDMAddress);
        return _servant;
    }
}
Now, of course, don’t forget to add this script as a component of your prefab. And, if you go to the inspector tab, you will see some familiar properties on this script: the IDM Address and the less used Citisim ID.
To test the script, create an instance of your prefab, set the IDM address,
and press play. You should see the advertisement of this object in the router
output, and also should be able to change its state using the
st-client again.
Exporting your asset
If you want to use this asset on another project, you should export
it as a Unity Package. There are two ways of doing this: using the
contextual menu of the editor, or by command line. I prefer
the later, because you can put it inside a Makefile, and generate
the package very easily, but this is a matter of preference.
Anyway, if you want to export your asset, I recommend you to make an specific folder for it, and then put every dependency that you want to include in your package inside that folder. In our example, it should be like this:
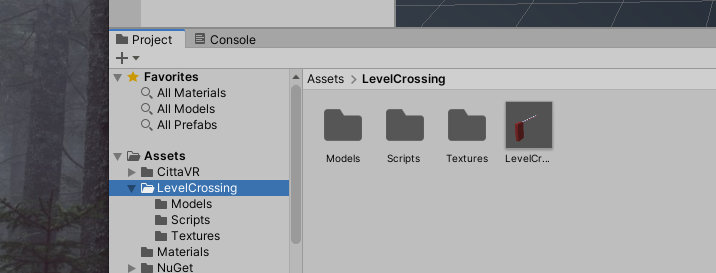
Unity: folders for our asset
Then, to export it using the editor, just click over that folder, and
select Export Package. Unity automatically will select all
dependencies of this asset, which includes CittaVR and many other
things that you don’t want to provide, so in the window that appears,
uncheck the box Include dependencies (at the bottom):
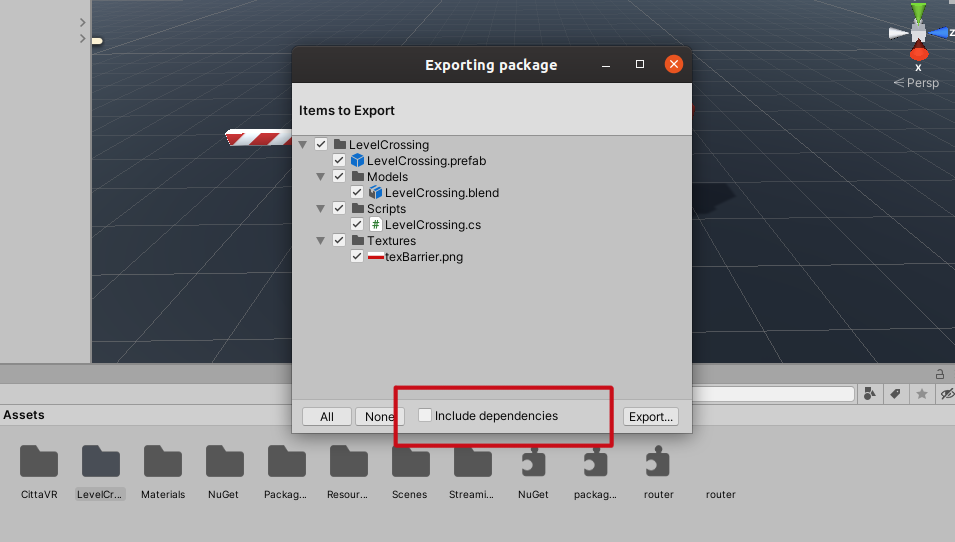
Unity: on export, don't include dependencies
Click on Export and save the package wherever you want. It’s also a
good idea to create a new Unity project and check that everything
worked fine.
If you want to do this process but from the command line interface, open a
terminal and go to your project folder. If you are using the new unity-hub (like
me), then you may need to create an alias for the binary unity to the location
you specified on setup. For example, I have all the unity installs in the folder
~/use/share/unity, so in my example, I will create the following alias:
alias unity='~/usr/share/unity/2019.3.0f6/Editor/Unity'
Then, to create the package, execute the following command:
Note:
unity -quit -nographics -batchmode \
        -projectPath "$(pwd)" \
        -exportPackage Assets/LevelCrossing \
        "$(pwd)/cittavr-level-crossing.unitypackage"
Compiling Slices with Unity
In many cases, you will need to use your own Slice interfaces, to provide a custom servant or to implement two or more interfaces in the same class. Then, you will need to compile the slices to C#, using the Slice translators. Again, you have two options: install the Ice 3.7 compilers on your system, and compile directly from the command line interface, or use the Slice4Unity package. Here we will see the later method.
So, go ahead and download the Slice4Unity package:
And add it to your project, as any other asset.
Note:
After the installation, you can now select any .ice file, and the
inspector will show you a button to compile the slice, like this:
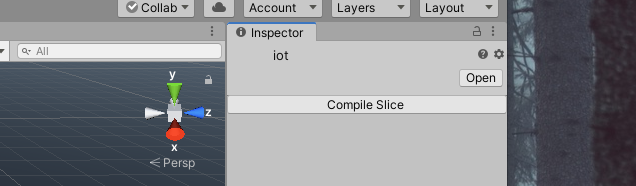
Slice4Unity: inspecting an slice file
When you press the button, it will create a folder called Generated with the
generated code for that slice interface. Nowadays, there is no other option,
like support for including other directories, but I’m working on it :D