Here, we will review a basic "Hello World!" example:
You will need an ESP32 device, and PlatformIO.
In this example, we will use a set of interfaces called
smart-transducer. So, first
of all, you will need to install the client tools on your machine. Add
the Pike repository to your
sources:
$ wget -qO- http://pike.esi.uclm.es/add-pike-repo.sh | sudo shAnd then, install using your favourite package manager, or run the following command:
$ sudo apt install smart-transducerOur goal is to switch on/off the onboard LED, so we will use the
ST module, in particular the interface IBool. It has
the following signature:
module st {
interface IBool {
void set(bool v, string sourceAddr);
};
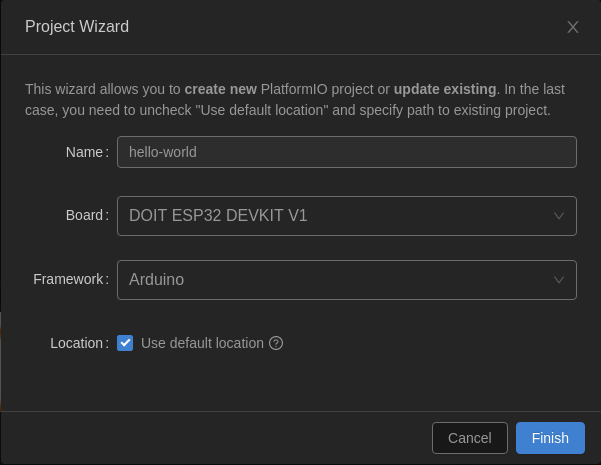
};So, open your PlatformIO IDE (I use VS Code), and create a new project. Give it a project name, and choose your board. For this example, I used a DOIT ESP32 DevKit, so my settings are:
Now, edit the platformio.ini file and add a pair of
library dependencies: icec and st. Also, I set
the serial speed to match the used in the example:
lib_deps = IceC, st
monitor_speed = 115200
Now, let's delve in the interesting part! Open the
src/main.cpp, which is the core of your program. First,
include the needed headers: those of IceC, the TCP endpoint and
ST:
#include <WiFi.h>

#include <IceC.h>
#include <IceC/platforms/esp8266/TCPEndpoint.h>
#include <IceC/platforms/esp8266/debug.hpp>

#include "st.h"
We also need to declare some basic objects: the Communicator, an Object Adapter and the servant for our LED. Do it in the global scope, to ensure that they are not disposed:
// Some global variables
Ice_Communicator ic;
Ice_ObjectAdapter adapter;
st_IBool servant;
Of course, you need to provide an implementation of every
method of your interface. In this case, there is only one method,
set(), which will change the LED status:
void st_IBoolI_set(st_IBoolPtr self, Ice_Bool v, Ice_String sourceAddr) {
  digitalWrite(LED_BUILTIN, v ? HIGH : LOW);
}
Now, inside the setup() function, we need to configure
the wireless conectivity. For this simple example, we will put
the device in AP mode, without credentials:
  String ssid = "hello-node";
  Serial.printf("\n--------\nWiFi: setting up AP as '%s'\n", ssid.c_str());
  WiFi.mode(WIFI_AP);
  WiFi.enableSTA(false);
  WiFi.softAP(ssid.c_str());
And then, initialize the Communicator, and create an Object
Adapter (please refer to the ZeroC Ice documentation for more information). For
this example, we will listen on port 1234:
  Ice_Communicator_init(&ic);
  TCPEndpoint_init(&ic);

  Ice_Communicator_createObjectAdapterWithEndpoints(
    &ic, "adapter", "tcp -p 1234", &adapter
  );
  Ice_ObjectAdapter_activate(&adapter);
Once the Object Adapter is ready, we can initialize and register
the LED object. In this example, I used the identity "led":
  st_IBool_init(&servant);
  Ice_ObjectAdapter_add(&adapter, (Ice_ObjectPtr)&servant, "led");
At last (but not least), you should include on your event loop
a call to the middleware engine, just to handle incomming events.
So, the loop() function may be:
void loop() {
  Ice_Communicator_loopIteration(&ic);
}
To summarize, your code may be like this:
#include <Arduino.h>
#include <WiFi.h>

#include <IceC.h>
#include <IceC/platforms/esp8266/TCPEndpoint.h>
#include <IceC/platforms/esp8266/debug.hpp>

#include "st.h"

// Some global variables
Ice_Communicator ic;
Ice_ObjectAdapter adapter;
st_IBool servant;

// The servant implementation
void st_IBoolI_set(st_IBoolPtr self, Ice_Bool v, Ice_String sourceAddr) {
  digitalWrite(LED_BUILTIN, v ? HIGH : LOW);
}

void setup() {
  // Common initialization
  Serial.begin(115200);
  pinMode(LED_BUILTIN, OUTPUT);

  String ssid = "hello-node";
  Serial.printf("\n--------\nWiFi: setting up AP as '%s'\n", ssid.c_str());
  WiFi.mode(WIFI_AP);
  WiFi.enableSTA(false);
  WiFi.softAP(ssid.c_str());

  // Initialize the communicator
  Ice_Communicator_init(&ic);
  TCPEndpoint_init(&ic);

  // Create the object adapter
  Ice_Communicator_createObjectAdapterWithEndpoints(
    &ic, "adapter", "tcp -p 1234", &adapter
  );
  Ice_ObjectAdapter_activate(&adapter);

  // Register servant
  st_IBool_init(&servant);
  Ice_ObjectAdapter_add(&adapter, (Ice_ObjectPtr)&servant, "led");

  Serial.println("Ready, waiting events...");
}

void loop() {
  // Wait for events
  Ice_Communicator_loopIteration(&ic);
}
The final step is to compile and upload the binary to your
device. Connect it to an USB port, and run the command
>platformio: build (or whatever you have in your IDE).
Once the process is complete, and your device has restarted, it
will create a new WiFi AP, called node-hello. Connect your
computer to it (remember, there is no credentials). It will assign you
the IP address 192.168.4.2, while the node address will be
192.168.4.1.
Now, if you connected successfully, change the state of your
led using the st-client tool:
$ st-client -t bool -p "led -o:tcp -h 192.168.4.1 -p 1234" 1
$ st-client -t bool -p "led -o:tcp -h 192.168.4.1 -p 1234" 0
If you see your device LED shining, congratulations!