Integrating Xiaomi Devices
Overview
Xiaomi (or Aqara or Mijia) has a family of products intended to be part of a Smart Home environment that everyone can install and use. They are beautiful and simple, but the associated cloud app sometimes does not fullfill our requirements (for instance, cloudless control).
Thus, here we present a Python library that you could use to interact with those devices, changing its state and receiving events from their sensors. Let’s review what you will need to follow up.
Xiaomi/Mijia smart home kit
Ingredients
For this recipe, you will need the following items:
- A Mijia Gateway, and the devices you want to control (PIR, push button, magnet sensor, …)
- A WiFi access point (you may also use your own Smartphone AP)
- An updated Debian/Ubuntu Linux box
- Python 3 installed and ready
- Pike’s repository for library package
For this last requirement, and if you already have Pike’s repository configured on your system, just install the library:
$ sudo apt install mijia-smart-home
Setting up the environment
The library you just installed uses what is called the Lan Communication API, which is an open API that allows third-party applications to control Mijia devices. It should be enabled on the Gateway, as it’s disabled by default.
So, your first step should be to install the “Mi Home” application on your smartphone. Now, plug the Mijia Gateway and wait for a chinese message. It should now blink on yellow. If not, press the button for 5 seconds and release. It should beep, say the message and blink on yellow. This state is the “binding” state. Now, open the “Mi Home” app on your smartphone.
If required, login or register. Then, press the upper-right plus button. It will show an scan procedure, and find the connected Mijia Gateway. Press it when found.
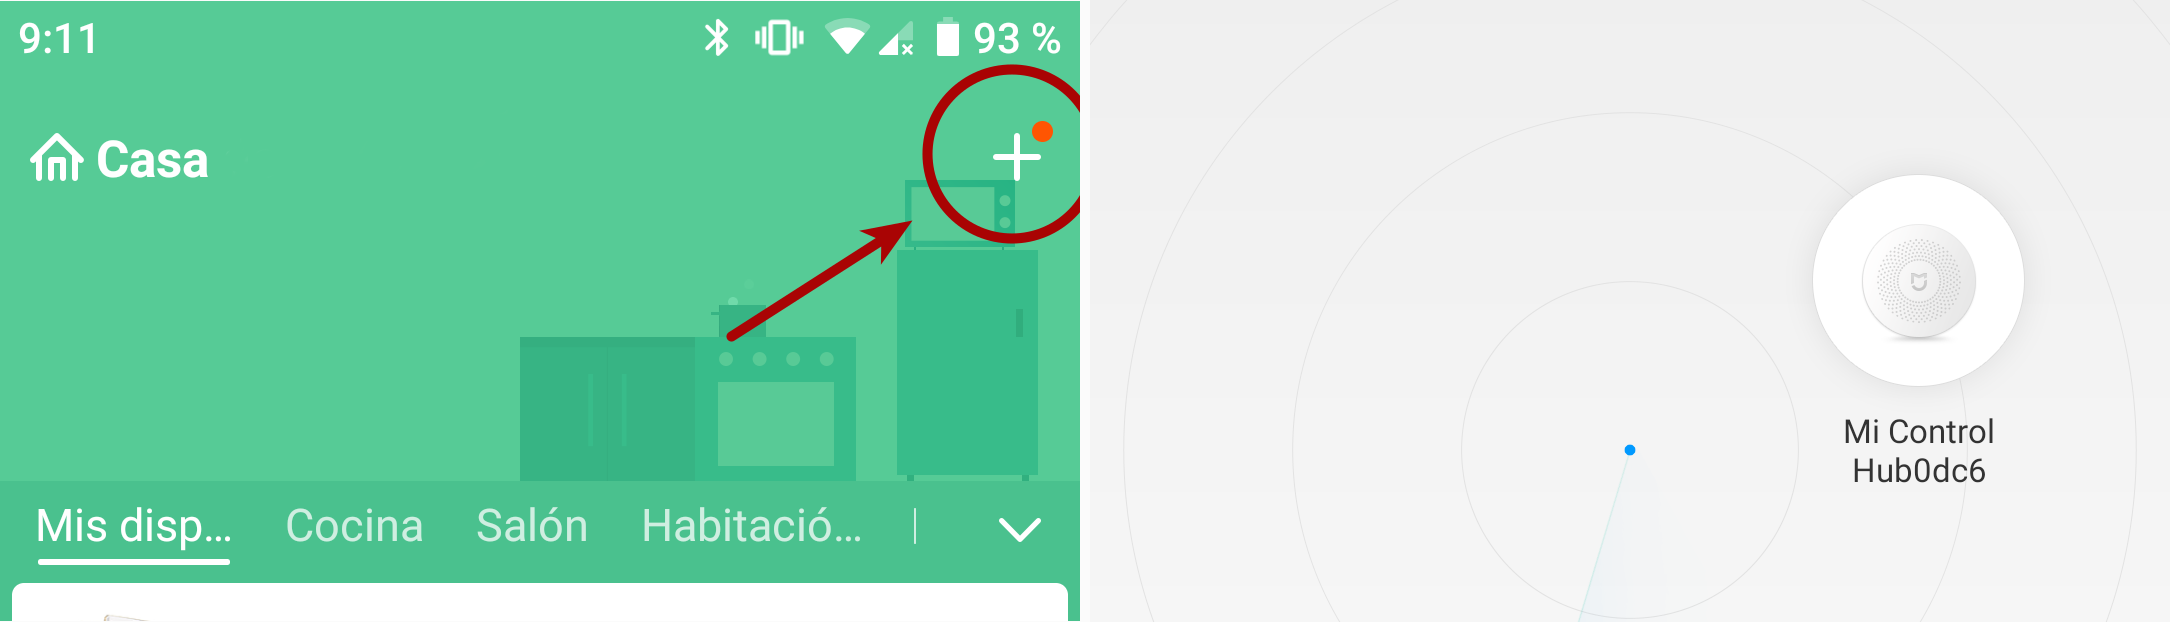
Adding Gateway to Mi Home
Now, it will show you a dialog to enter the WiFi credentials. The Mi Home app wil send this information to the Gateway, so it can also connect to your AP. Just select your SSID and provide the AP password. Note that this AP must have Internet conectivity for this step to be completed. But just for this step, once the Gateway is configured, you can let the AP isolated from the Internet.
Press “next”, and the app will finish the setup procedure. You may also hear a message from the Gateway saying that the connection is ready.
Next, select the Gateway in the app, and open its “Settings”, and press on “About”.
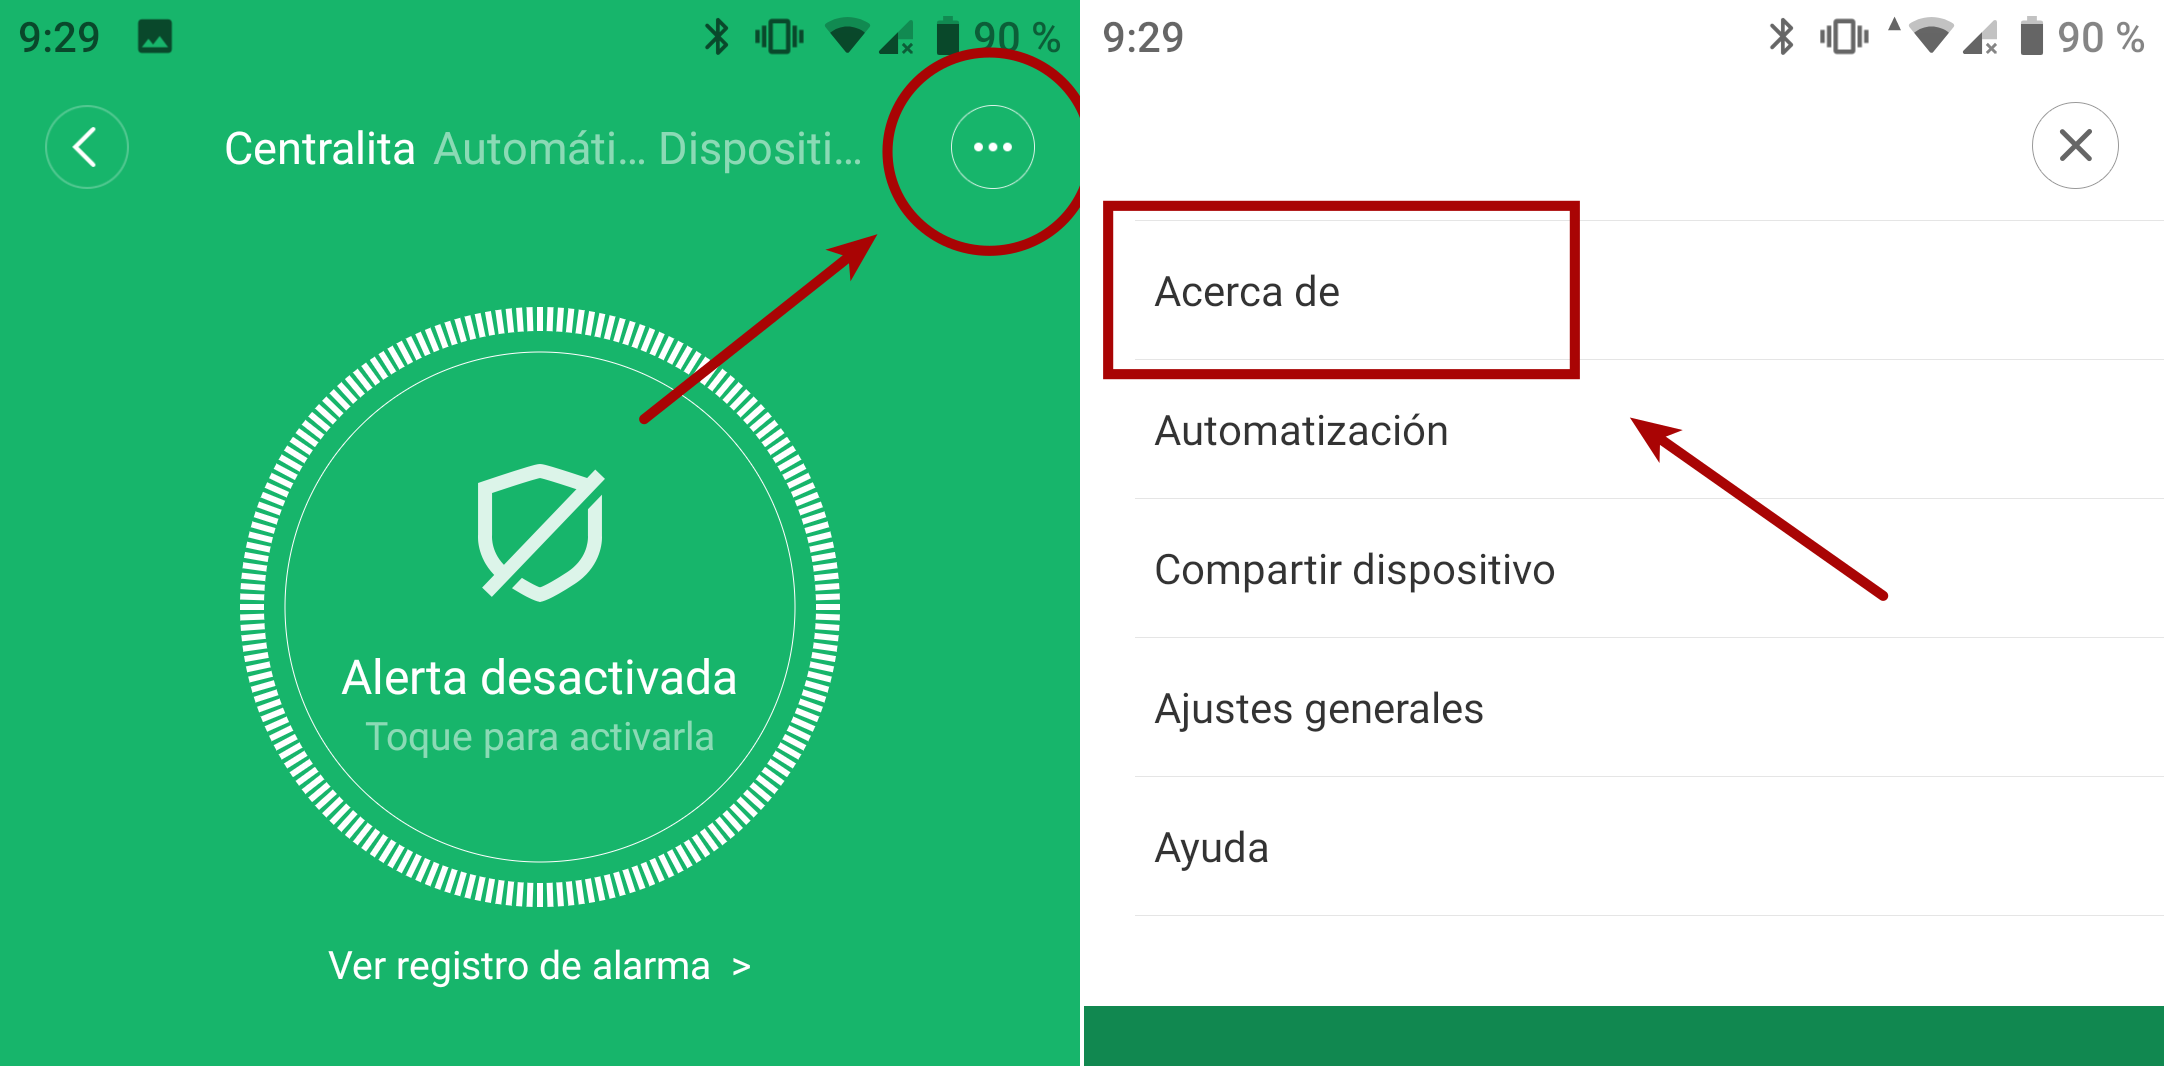
Gateway 'settings' > 'about'
It will show you an screen with a link to the forum, and the “Plug-in version” at the bottom. Press that label (“Plug-in version”) until you see a message, and more options appear.

Enabling the hidden settings
There, you should see now the option “Wireless communication protocol”. Tap it. Here you can enable the protocol, and regenerate a new password. Do both of them, and store the password, as you will need it later. Press OK when finish.
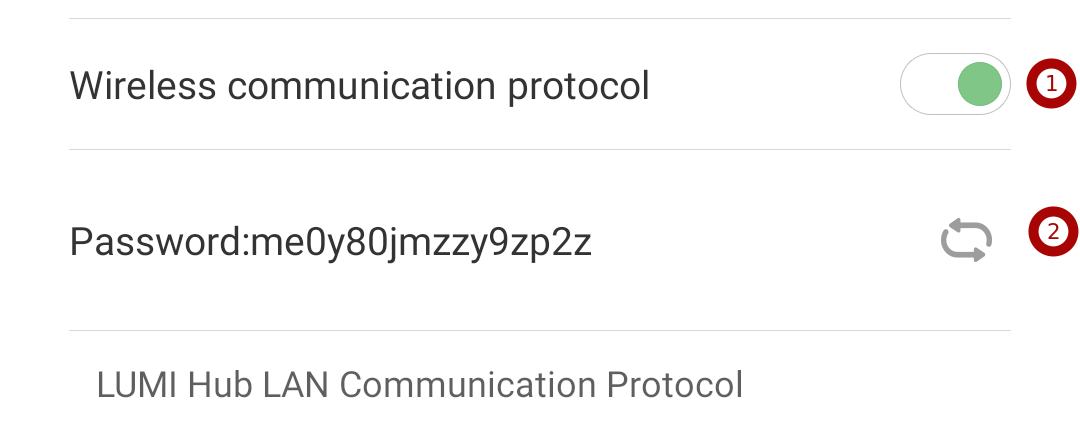
Enabling the 'Wireles Communication Protocol'
Now, you can disconnect your WiFi from the internet (if you want), and close the “Mi Home” app. You are now ready to use the library.
Connection to the Gateway
The mijia-smart-home library provides some objects that represents the real-life devices. You can call these object’s methods to attach handlers that will be called when an event arrives, or call directly a method to change the state of some device.
So, the first object you should create is the Gateway itself. Import the library and create a LumiGateway() instance. Then, call the method start(), which does the following:
- Starts a discovery stage, to find the Gateway.
- Setups a listener thread, to process incoming events from it.
from mijia import LumiGateway

gw = LumiGateway()
gw.start()
Warning!
The LumiGateway’s constructor has some parameters but we will review them later. When the start() returns, you can inspect the list of linked devices to the Gateway (both online and offline).
for dev in gw.get_devices().values():
    print(dev)
Each device is of an specific class, having its specific methods, but all of them have an sid, which is the device identifier, and a status, which indicates if the device is online and the Gateway acknowledges it or not. The rest of the interface will be analyzed in following sections.
So, the full code for this part would be:
#!/usr/bin/python3

from mijia import LumiGateway


class ListDevices:
    def __init__(self):
        # create the gateway
        gw = LumiGateway()
        gw.start()

        for dev in gw.get_devices().values():
            print(dev)


if __name__ == "__main__":
    ListDevices()
Running that script in a well configured environment, should yield something like this:
$ ./list-devices.py
INFO:root:using 192.168.8.157 for multicast membership
WARNING:root:using not ciphered key (password not provided)
<Plug, sid: 158d0002699f12, status: unknown, enabled: False, inuse: False>
<Magnet, sid: 158d0002520b26, status: unknown, open: None>
<Switch, sid: 158d00027b8eff, status: unknown, pressed: False>
<WeatherV1, sid: 158d0002c8f54e, status: unknown, temp: 10000, humi: 0, press: 0>
<Unsupported Device, sid: d0cf5efffeccf1dc, status: unknown>
<Motion, sid: 158d0002567d32, status: unknown, elapsed: None>
<SensorCube, sid: 158d00029a8fa6, status: unknown>
Receiving events
On the above listing you can see a number of defices, each one of an specific class. For instance, there are a Switch and a Motion, and both emit events when somenthing happens. You can configure event listeners to be run when one of such events arrives. There is also an Unsupported Device, which is a device that the Gateway sees but can not control (yet).
So, let’s subscribe to some event. To do that, each device has one method per event type, usually called on_[event_name](). For example, the Switch object will emit click events when single pressed, double_click when double tapped, and so on. If you want to know the supported devices and their events, please see the Mijia Smart Home API. For now, we are interested only in the click event, so we use the on_click() method to register our listener. A listener is just a function (or method) that will be called upon event arrival, so let’s define it:
def on_event(self, event, dev):
    print("- event: {}, dev: {}".format(event, dev))
As you can see, the method receives two arguments:
event: which is the name of the event (so you can reuse this method for multiple event types)dev: which is the device object that produced this event
These arguments are common to all event types. This event does not have any specific argument, but other events do (so please, review the correct signature for your event type!).
Now, it’s time to register the listener. So the first step is to get the Switch object. The Gateway’s get_devices() method has an optional argument, filter, used to return only devices of an specific type. In my case there is only one Switch, so the code would be:
devices = gw.get_devices(filter="switch")
switch = list(devices.values())[0]
And now, to subscribe the listener method to the click event, you need to use the on_click() method:
switch.on_click(self.on_click_event)One last step: as all of the previous methods are non-blocking, if you run the script, it will finish before any event may arrive. To solve this, we could wait somehow (for instance using a sleep, or with an event loop). Also, we could use the Gateway’s waiting function, wait_until_break(), which does that very thing: sleeps until a Ctrl+C is received, and then returns. So, the whole script would be:
#!/usr/bin/python3

from mijia import LumiGateway


class SwitchListener:
    def __init__(self):
        # create the gateway
        gw = LumiGateway()
        gw.start()

        # get the switch device
        devices = gw.get_devices(filter="switch")
        switch = list(devices.values())[0]
        switch.on_click(self.on_click_event)

        # wait for incomming events
        gw.wait_until_break()

    def on_click_event(self, event, dev):
        print("- event: {}, dev: {}".format(event, dev))


if __name__ == "__main__":
    SwitchListener()
If you run it, and then press the button once, you may obtain a result like this:
$ ./switch-listener.py
INFO:root:using 192.168.8.157 for multicast membership
WARNING:root:using not ciphered key (password not provided)
- event: click, dev: <Switch, sid: 158d00027b8eff, status: online, pressed: False>
Sending actions
Some devices allow you to change its state. For instance, you are able to switch on and off the Plug, or change the light status of the LumiGateway.
In order to gain permission to modify the state of any device, you must provide the password that the Gateway is using (remember the number that you got when activating the Lan Protocol?). So, you need to change the LumiGateway instantiation like this:
gw = LumiGateway(passwd="thePassword")Of course, you don’t want to store the password inside the script, so it may be a variable obtained elsewhere (in our example, we will use sys.argv[1], but it is not a good place either).
Now, to change some parameter of your device, just call the appropiate method with the required arguments. For instance, to change the light of the Gateway, we use set_light_color(), which accepts the values for Red, Green and Blue components (in relative range of 0-255), and also the Intensity (from 0 to 100). If you want a bright red color, your call will be:
gw.set_light_color(255, 0, 0, 100)Or, if you want to smoothly range from green to red:
for i in range(0, 255):
    gw.set_light_color(i, 255-i, 0, 100)
    time.sleep(0.05)
To review the devices that you can control, and what methods they have, please go to the Mijia Smart Home API section.